WordPress Image Management: Everything You Need to Know

Organize, Optimize and Edit Your Images in WordPress
Images are one of the most important pieces of content you’ll add to your website. They can breathe life into your blog posts, making the content you write more digestible and understandable. This can result in more clicks, more views and more conversions; it’s pretty important that you choose or create great images for your website.
Of equal importance is taking the steps to properly optimize your images. Unnecessarily large images can slow your website’s loading speed and, as a result, impact the user experience and affect your search rankings.
And not of the least importance is making sure you properly name and label your images. It’s a small step that can have big impacts on how search engines index and rank your website.
Luckily, for those running WordPress, there are several great and easy ways to edit, optimize and manage your photos so that you can get the most out of them, both in terms of style and performance. Let’s dive in!
WordPress Image Management and Optimization
There are a few different techniques you can employ to optimize the images on your WordPress website. But let’s start from the beginning: What format you should be using before you ever even upload your images.
IMAGE FORMATS
There are a few formats that are prevalent on the web today and, while many people think they’re interchangeable, they aren’t. You’ll give yourself a sizable performance advantage by choosing the right one.
JPG images are great for photographs. They do an amazing job of compressing the information into a much smaller file size without degrading the quality of the image too much.
PNG images, on the other hand, are a lossless image format, which means they’re much higher quality than a JPG. The tradeoff is that, for photographs, the file size is much larger.
SVG files are vector files. This means that the image is created using math coordinates rather than pixels. They’re text files that are translated into graphics. They’re great for icons, logos and simple illustrations. Furthermore, they have excellent image quality, small file sizes, and they can be resized directly on your website using CSS.
WebP is a relative newcomer to the image format scene, so it’s not yet supported in every browser. But if your website’s visitors are capable of viewing them, you’ll want to use WebP exclusively—the format offers better image quality than PNG and smaller file sizes than JPG.
Now that you know what formats you should be using for your images, let’s look at how you should be naming them once you’re ready to upload them to WordPress.
HOW YOU NAME YOUR IMAGES
While humans can look at images and decide whether they like them, search engines cannot. They use a number of other indicators to determine if an image is accurate and relevant. One of those indicators is the file name.
The file name should be a short description of the image—no more than five words—and each word should be separated by hyphens. For even better results, you can include a keyword or phrase you’re targeting with the page or post you’re adding the image to. Here are a few example names:
- sunset-over-a-lake.jpg
- cheesy-slice-of-pizza.jpg
- car-in-a-garage.jpg
Giving your images descriptive file names is quick and painless, and it can make a difference in your search rankings.
ALT TEXT
Alt text is used to describe an image that can’t be viewed by your website’s visitor. This can be because they have images disabled in their browser, or they have a vision impairment, and they’re accessing your website with a screen reader.
Accessibility for accessibility’s sake is a benefit for everyone. For this reason alone, it’s important to make sure you have alt text on all of your images. But accessibility is also a ranking factor in search engines, so not including it can impact your rankings.
Moreover, on the topic of rankings, alt text is also important in indicating to search engines that the image is relevant and accurate, so making sure you have accurate, descriptive alt text will help with rankings in this regard as well.
To modify an image’s alt text, go to your Media Library in your WordPress dashboard and click on the image you want to update the text for. On the right side of the image, you’ll see the forms to enter the image’s alt text, title, caption and description.

Enter the appropriate text and click the close button. No need to save anything here—WordPress saves it automatically.
Pro Tip: If you need a little help figuring out what to write for your alt text, check out W3C’s alt text decision tree—it’s an incredibly handy tool for coming up with solid alt text.
HELPFUL PLUGINS FOR OPTIMIZING AND MANAGING IMAGES
Most of the management and optimizations for images are relatively easy to do on an ongoing basis, but if you find you’re woefully behind with image formatting or naming, here are a few plugins that can help.
reSmush.it
The reSmush.it plugin uses a free, online API to optimize and compress images. Once it’s installed, you don’t have to worry about doing anything extra—the plugin automatically compresses your images when you upload them.
However, if you want a little more control over how and what gets optimized, you can go into the plugin’s settings under Media and disable the “optimize on upload” setting. Once disabled, you’ll have to go into your media library and select individual images to optimize them.
MEDIA FILE RENAMER
Media File Renamer is a WordPress plugin that renames your media files. It can be automatic (depending on certain conditions) or manual. It is excellent for SEO, to keep your WordPress tidy and to avoid issues related to files. The references to those filenames on your website will also be updated. It has many features, and if you are a developer you can automate the whole process and how the renaming is performed.
There are three main ways to trigger the renaming process of your files. The first is by changing the title. In your media library, when you change the title of your image, Media File Renamer will automatically update the file name to match.
Next is the Auto button which can be viewed in list mode of your media library. On the left-hand side, there’s a “Renamer” column with the aforementioned button that you can click on to automatically change the file name.

Lastly, the plugin’s dashboard can be used to manually rename your files or perform other bulk actions. If you have a lot of files to manage and rename, the dashboard is useful in helping you get things organized.
WEBP CONVERTER FOR MEDIA
For those of you looking to start using the WebP format, the WebP Converter for Media plugin can help you configure your WordPress website to do so. The plugin does three things for you:
- It converts your existing images to WebP while retaining the originals
- It converts any new image uploads to WebP
- It configures your website to use old images formats for browsers that don’t support the format
Given the last point, it’s an incredibly useful plugin for optimizing performance on your website. Users that are using modern browsers will benefit from a noticeable performance increase while those that aren’t won’t experience any negative side effects.
Once the plugin is installed, you can configure it by clicking on Settings and then WebP Converter in your WordPress dashboard. Within the plugin settings, you can select the image formats you want to convert, the quality you want your images to be, as well as which directories you’d like to target for image conversion.
Pro Tip: If you use gif images on your website for animated images, go ahead and check the box to convert them—WebP supports animations!
The plugin will automatically convert any new images to WebP, but you’ll need to convert your existing images manually. To do so, scroll down to the Regenerate images section and click the Regenerate All button. This will convert all of your existing images, where appropriate.

Once your images are converted, there’s nothing else for you to do. When you upload images in the future, the plugin will automatically take care of converting them and then configuring your website to serve them to compatible browsers.
Editing Your Images in WordPress
Image management and optimization is undoubtedly important, but equally so is how your images look. And sometimes you need to do a little editing to get them to look just right.
Granted, WordPress can’t begin to compete with the likes of Photoshop or other professional image editing applications, but it does have a few tricks up its sleeve if you need to do some basic editing. Let’s take a look.
From your WordPress dashboard, click on your media library and then on the image you’d like to edit. From here, click on the Edit Image button below the image preview.
Keep in mind that when you edit your images, WordPress saves a perfect copy of the original. And while the option isn’t available currently because we haven’t edited anything yet, once we’ve made changes, we can come back into the editing panel and there’ll be an option to restore the original photo.
That said, the main functionality can be found across the top that offers some basic editing tools.

CROP, ROTATE, FLIP AND UNDO
The Crop button allows you to draw a square around a portion of the image that you’d like to crop. Handy for selecting only the part of the photo you want to use on your website.
Rotate left and Rotate right will both rotate your image in 90 degree increments. This can be useful for textures or patterns that you want to tweak a little.
Flip vertical and Flip horizontal will mirror the image top to bottom or side to side, respectively. Flipping horizontally can be handy if you have a nice stock photo you’d like to use but the composition of it doesn’t quite match up with the flow of your website. It’s amazing what a simple flip can do to bring a page design together.
And of course, there are the Undo and Redo buttons for, well, undoing and redoing your changes.
Next, on the right-hand side of the editor, you’ll notice a few extra settings.
SCALE, CROP AND THUMBNAIL SETTINGS
The Scale Image tool allows you to scale an image down, useful for when you have an extra large image. Keep in mind that this tool keeps images proportional, so if you enter a size in the width field, the height field will automatically populate and vice versa.
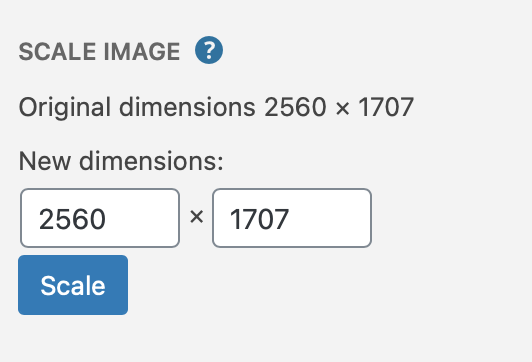
Image Crop actually works in conjunction with the Crop button. This is a great tool for if you have an image that you want to use on your website, but you need to maintain a certain aspect ratio—for a header image, for example.
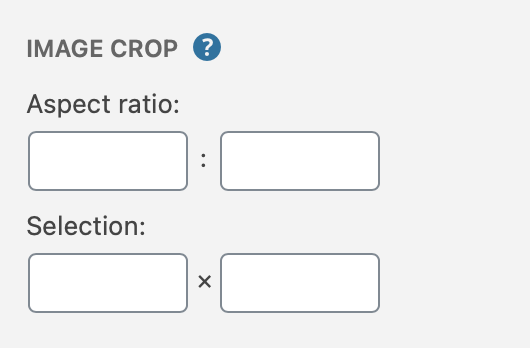
To use it, simply input the aspect ratio you’d like to use in the top field and then draw a box on your image. The bounding box will retain the aspect ratio you entered. From here, you can save and close, or you can click the Crop button if you have more editing to do.
Lastly, the Thumbnail Settings section allows you to select whether you want your changes to apply to the main image, the thumbnail or both.

For example, if you wanted to create your own custom thumbnail of the image, you can use the crop tool to select the area you want to appear in the thumbnail, then select the Thumbnail setting and click the Crop button.
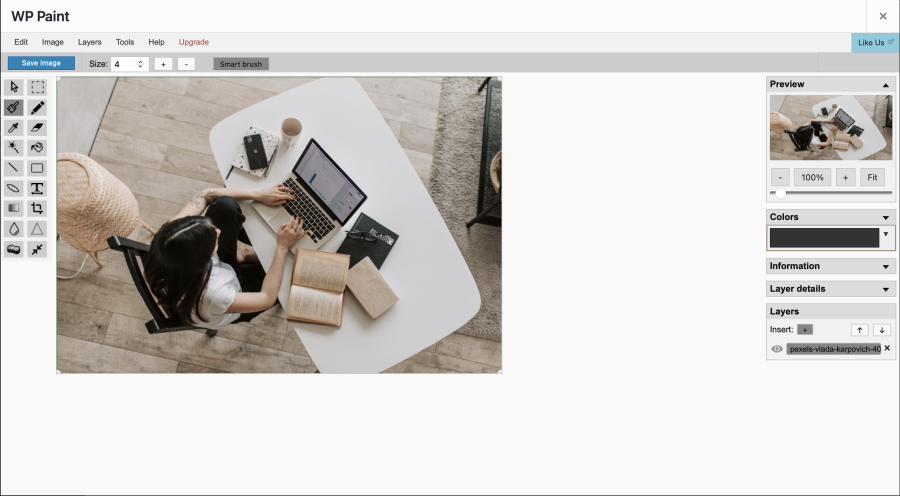
ADVANCED IMAGE EDITING WITH WP PAINT
The WordPress image editor is handy if you need to create custom thumbnails or if you’re away from your main computer and need to throw something together in a pinch. But it’s not going to win you any graphic design awards.
That said, WP Paint is a free plugin that’s fairly well-rounded and offers a decent amount of image editing and manipulation features. The roster includes:
- Flip, rotate, crop and resize
- Layer editing and management
- Add shapes and text
- Add blur or blur effects
- Customize the hue, saturation and brightness of images
If you’ve used pretty much any image editing software, WP Paint’s interface will be comfortable, with all the various editing tools on the lefthand side and some layer management panels on the right.
While WP Paint is a handy plugin if you need to do some quick photo manipulation, it’s best to go with a dedicated image editing application to get the most out of your photos.
Final Thoughts: WordPress Image Management
Your images are immeasurably important to your website. They communicate your ideas visually, establish your brand and tone, impact your search rankings and help keep your visitors engaged, entertained and informed. They have the power to make or break your website in more than one way.
In other words, take the extra time to create, polish, manage and optimize your images. Considering the potential impacts and pitfalls, it’s more than worth it. And if you simply don’t have the time to do it yourself, you might want to consider a WordPress management service to ensure the ongoing success of your website.
Join Our Newsletter
Stay up to date on the latest WordPress tips and news