Jetpack Newsletter: How to Set Up a Blog Subscription Service in WordPress

Keeping your readers informed about new content is essential for growing a blog, and one of the best ways to ensure consistent engagement is through a blog subscription service. By allowing users to subscribe to your blog, you can automatically notify them whenever a new post is published.
Jetpack, one of the most popular WordPress plugins, makes this process easy with its Subscriptions module, which sends email notifications to your subscribers without the need for complex configurations or third-party services. In this guide, we’ll walk you through the steps to set up a blog subscription service in WordPress using Jetpack Newsletter.
What is Jetpack Newsletter?
Jetpack is a versatile plugin created by Automattic, the same company behind WordPress.com, designed to add a wide range of features to your WordPress site. From security and performance enhancements to SEO and social sharing tools, Jetpack offers a robust toolkit. One particularly useful feature for bloggers is Jetpack Newsletter (formerly Jetpack Subscriptions).
Jetpack Newsletter allows users to sign up to receive notifications via email whenever you publish new content. It is fully automated, and once it’s set up, your subscribers will never miss a blog post again. This feature integrates seamlessly with your WordPress site and works through your connected WordPress.com account. In addition to its ease of use, Jetpack Newsletter offers a straightforward way to manage your subscribers directly from your WordPress dashboard.
Why Use Jetpack Newsletter?
There are several reasons why Jetpack Newsletter is an excellent option for bloggers.
First and foremost, it’s incredibly simple to set up. Unlike other subscription services that may require complex configurations or third-party integrations, Jetpack Newsletter works natively within WordPress, making it an accessible option for all skill levels.
Another benefit is that it integrates smoothly with your site, meaning you don’t need to worry about compatibility issues. Jetpack handles everything from subscription forms to email notifications, all from a single plugin.
Furthermore, the service is completely free and comes bundled with other useful features offered by Jetpack, such as security, performance optimization, and social sharing tools.
Building a subscriber list also has long-term benefits. It allows you to build a loyal readership, drive consistent traffic to your site, and foster deeper engagement. With Jetpack Newsletter, you can ensure that your blog audience stays informed and connected.
Prerequisites for Using Jetpack Newsletter
Before you can start using Jetpack Newsletter, there are a few things you’ll need to have in place.
First, you’ll need to install and activate the Jetpack plugin if you haven’t done so already. To do this, go to your WordPress dashboard and navigate to Plugins → Add New. Search for “Jetpack,” then click Install Now next to the plugin named “Jetpack – WP Security, Backup, Speed & Growth” and activate the plugin.
Upon activation, you will be presented with the Welcome splash screen below.
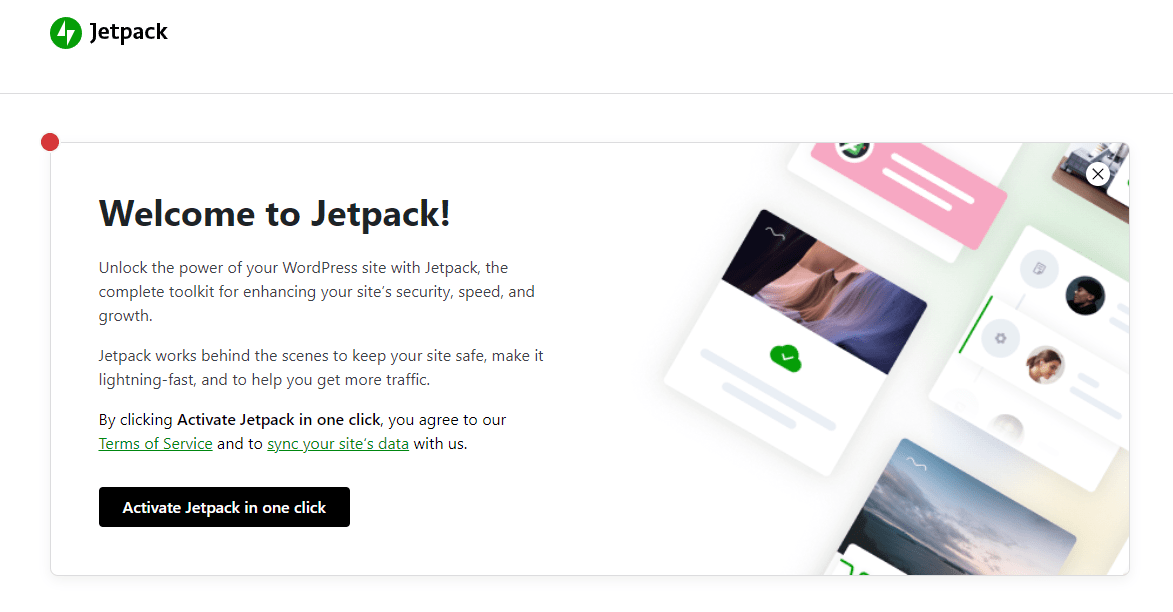
At this point you will need to connect the plugin to a WordPress.com account. This step is essential because Jetpack relies on WordPress.com’s infrastructure to send emails and manage your subscription list.
Click on the “Activate Jetpack in one click” button to connect the service.
On the next screen, click on “Skip onboarding”.
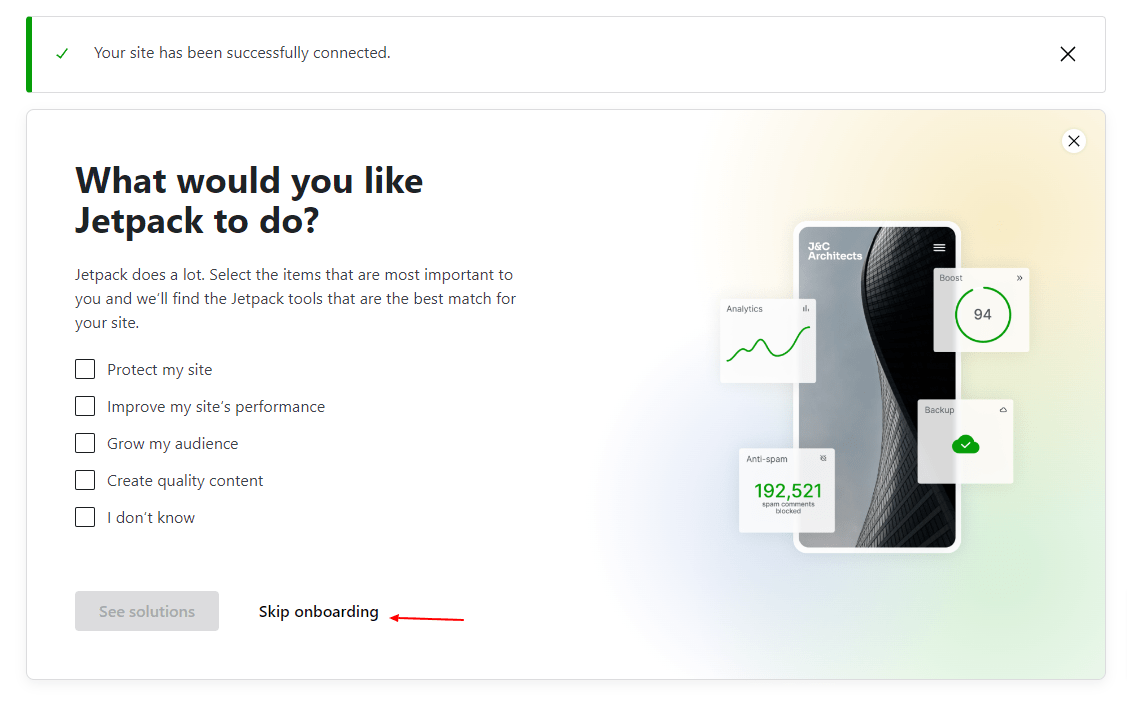
Next, scroll to the bottom of the screen, and click on Sign in.

Now click on the “Connect your user account”.
On the next screen, you will be asked to enter the email address associated with your WordPress.com account. If you don’t already have a WordPress.com account, you can create one during this setup process.
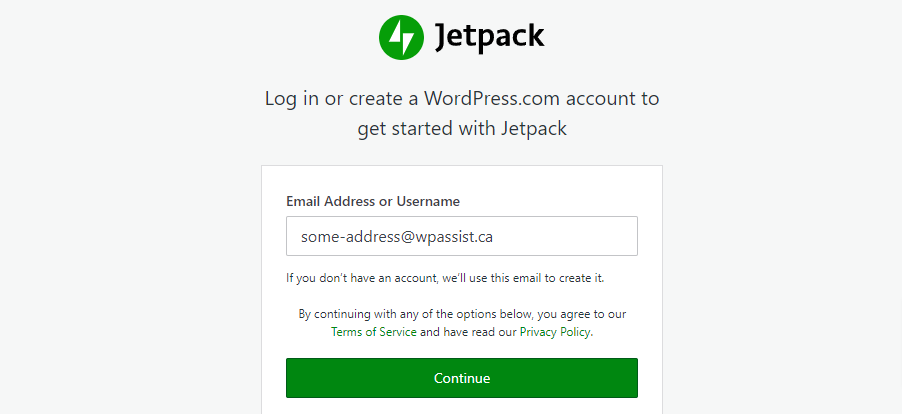
Once you sign in (or create a new account), scroll to the bottom of the screen and click on “Start with Jetpack Free”.
This will take you back to your website in order to continue with the Jetpack Newsletter setup.
Setting Up Jetpack Newsletter
The process of setting up Jetpack Newsletter is quick and user-friendly. Follow these steps to get started:
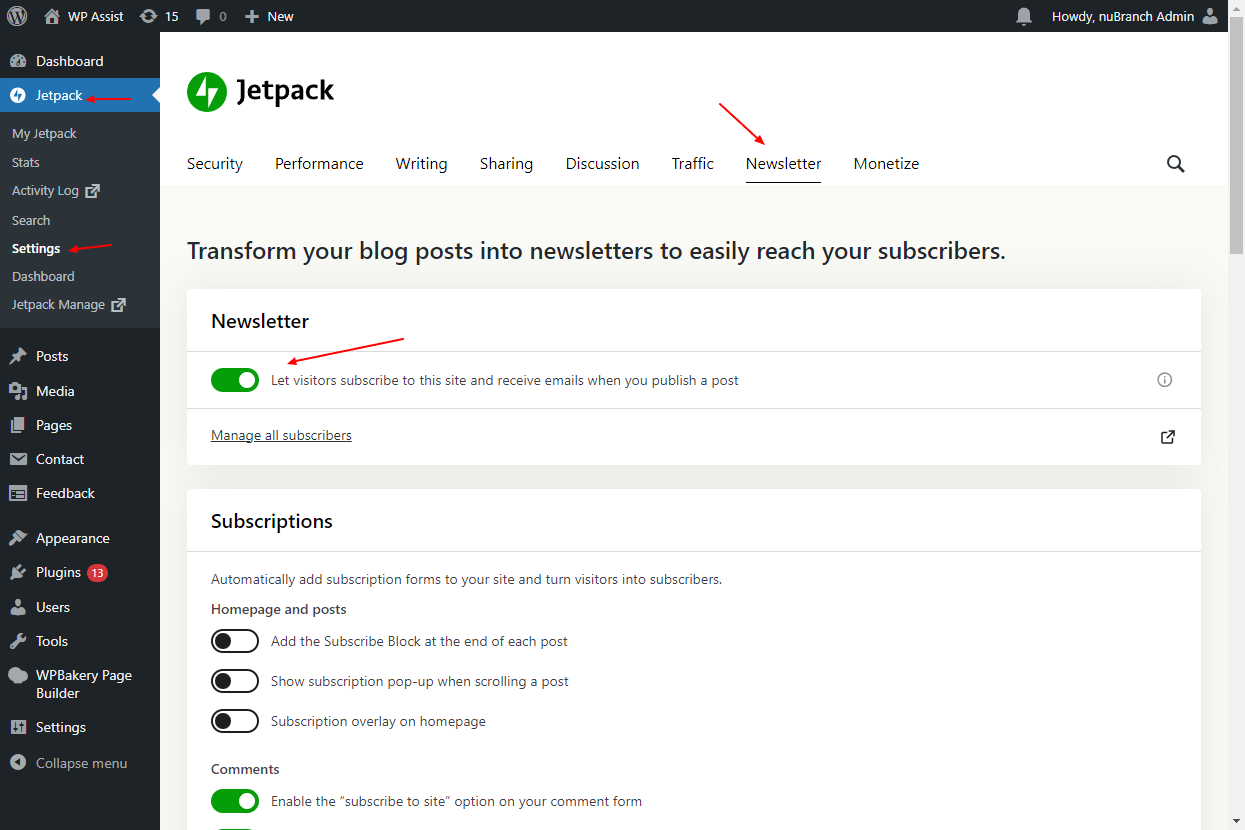
First, ensure that the Subscriptions module is activated. In your WordPress dashboard, navigate to Jetpack → Settings → Newsletter, and toggle on the subscription feature.
Next, you’ll want to add the subscription form to your site.
Jetpack Subscription Forms
Once your subscription form is placed, Jetpack will automatically handle email notifications. Whenever you publish a new blog post, your subscribers will receive an email notification with the post title, an excerpt, and a link to read the full article. Jetpack’s email templates are clean and simple, making it easy for readers to engage with your content directly from their inbox.
To maximize the effectiveness of your subscription form, consider placing it in high-visibility areas of your site, such as the sidebar, at the end of blog posts, or even as part of a dedicated landing page. The easier it is for visitors to find the subscription form, the more likely they are to sign up.
Jetpack makes this easy by providing a few different methods of presenting your visitors with a subscription form on your website. You can either:
- Add a subscription form at the end of each post. This is done automatically by the plugin simply by checking the first options under Subscriptions.
- Show a pop-up with the subscription form as visitors scroll through a blog post. Again, this can be done automatically by checking the second option as seen in the image above.
- You can also show an subscription overlay on the homepage. This is shown immediately when the homepage is loaded, so might not be a very subtle solution for some.
These options might be an overkill for some, as the subscription form will be shown at the bottom of every page.
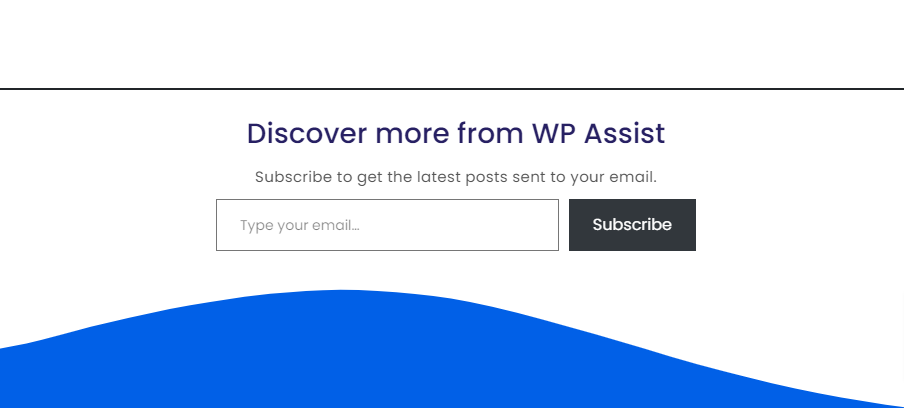
Another option is to use the Jetpack Blog Subscriptions Widget.
Blog Subscriptions Widget
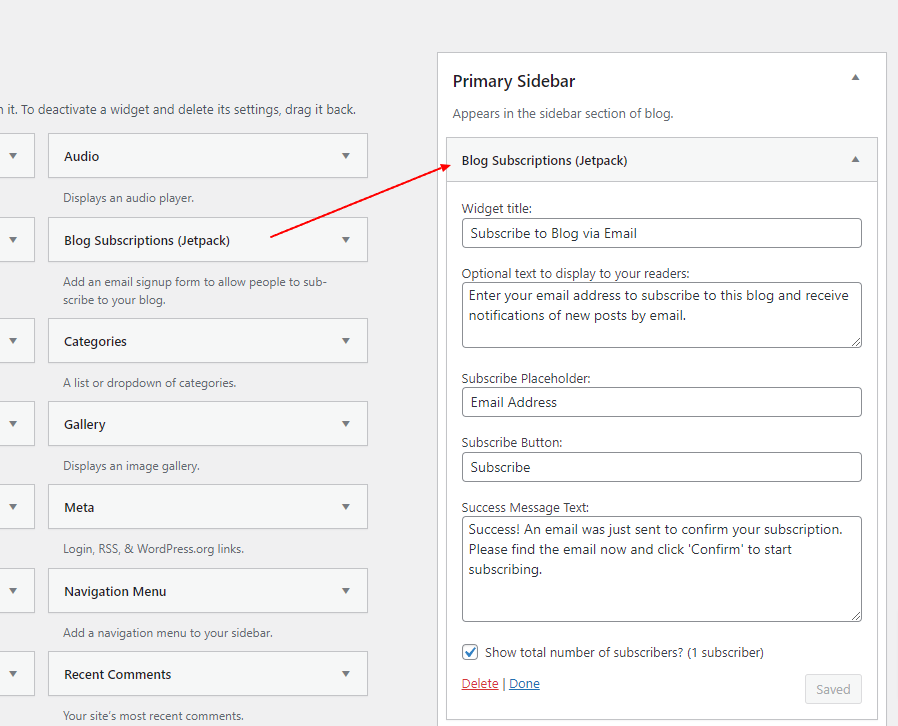
Instead of having the plugin automatically add the subscription form to every page, you can opt to use a sidebar widget instead. In order to add the widget to a sidebar on your blog page, follow these steps:
- Go to Appearance → Widgets
- Locate the “Blog Subscriptions (Jetpack)” widget
- and drag it to your sidebar, footer, or any other widget area.
- You can customize the title and message of the widget to match your site’s style and encourage users to subscribe.
Add a Subscription form with Shortcodes
The final and most flexible method of adding a subscription form to your website is through a shortcode. For example, if you wanted to add the subscription form to the bottom of each blog post (but not to regular pages), you can add the shortcode below to your blog post template:
[jetpack_subscription_form title="Join Our Newsletter" subscribe_text="Enter your email address to subscribe to this blog and receive notifications of new posts by email." subscribe_button="Subscribe"]Configuring the Newsletter’s Email Options
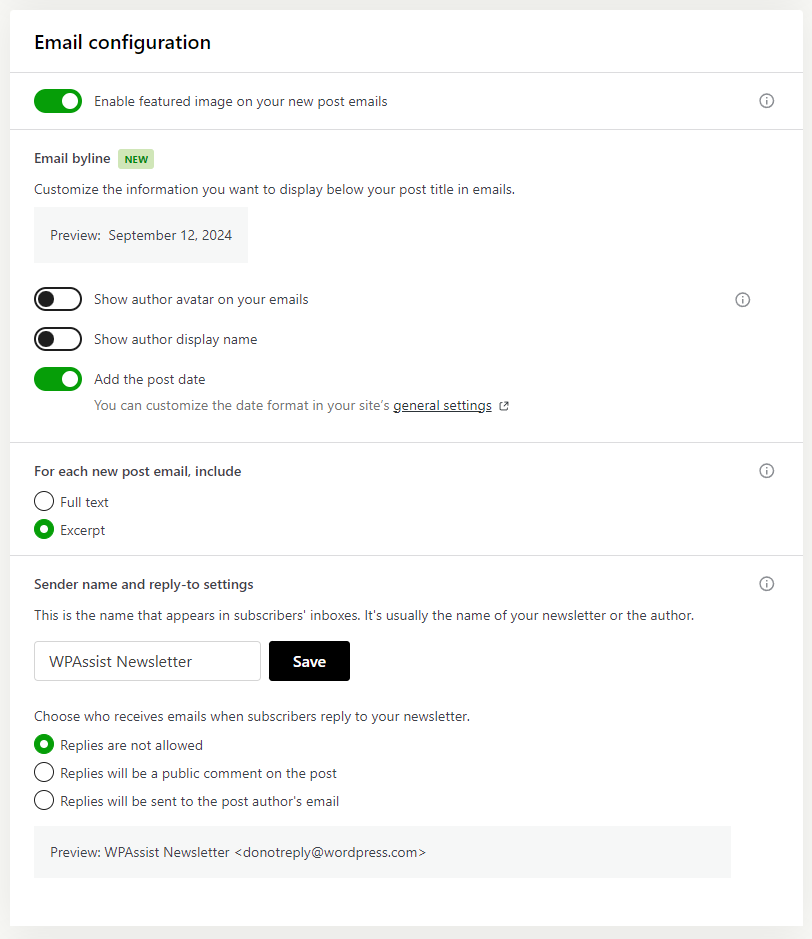
Another aspect of the Jetpack Newsletter plugin that needs your attention is the “Email Configuration” options.
You can decide what type of information you want included in the emails sent by Jetpack when a new blog post is published.
You can also decide whether you want to allow your subscribers to reply to those emails or if their replies can be used as comments added directly to the blog post in question.
Managing Subscribers with Jetpack
Once your subscription service is live, you’ll want to keep track of your subscribers. Jetpack makes it easy to manage subscribers through your WordPress.com dashboard. From here, you can view a complete list of all subscribers and manage their settings. Jetpack allows you to export your subscriber list if you need to move it to another service or platform in the future.
Subscribers will receive automatic email notifications whenever you publish a new post. Subscribers have the option to adjust the frequency of these notifications. For instance, you they choose to receive immediate notifications or have them bundled into a daily or weekly digest. Jetpack’s flexibility ensures that your email communication is tailored to your audience’s preferences.

Best Practices for Building Your Subscriber List
While setting up Jetpack Newsletter is straightforward, growing your subscriber list requires ongoing effort. The most important factor is ensuring that your subscription form is easily accessible. Place the form in multiple locations across your site to capture as many sign-ups as possible.
Additionally, consider adding a clear call-to-action (CTA) that invites users to subscribe. For example, a message like “Subscribe to get the latest blog posts delivered to your inbox” can encourage visitors to join your mailing list. Offering exclusive content, such as a free eBook, tips, or access to premium content, can also provide an incentive for users to subscribe.
Once your subscriber list starts growing, focus on maintaining a consistent publishing schedule so that your readers know what to expect. Consistency builds trust and ensures that your subscribers stay engaged with your content over the long term.
Troubleshooting Common Issues
While Jetpack Newsletter generally runs smoothly, there are a few common issues that may arise. One of the most frequent problems is email notifications not being sent. This can happen for a variety of reasons, such as improper configuration or connectivity issues with WordPress.com. If you run into this issue, try disconnecting and reconnecting Jetpack, or check your plugin settings to ensure the Subscriptions module is enabled.
Another issue you might encounter is emails ending up in spam folders. To improve deliverability, encourage your subscribers to whitelist your email address, and use Jetpack’s built-in tools to ensure your emails are correctly formatted and compliant with anti-spam regulations.
Lastly, make sure that new subscribers have verified their email addresses. Jetpack sends a confirmation email when users subscribe, and they must click the link in this email to complete the subscription process. If a subscriber claims they are not receiving emails, encourage them to check their spam folder or confirm that they have completed the verification process.
Conclusion
Jetpack Newsletter is a powerful and easy-to-use tool for bloggers who want to keep their audience informed about new content. By following the steps outlined in this guide, you can set up a blog subscription service on your WordPress site in no time. Whether you’re building a new blog or looking to expand your existing audience, Jetpack Newsletter provides a simple way to engage your readers and ensure they never miss a post. Now is the perfect time to implement a subscription service and start growing your blog’s community.
Join Our Newsletter
Stay up to date on the latest WordPress tips and news


